Chemical safety:
1. During the part of the experiment that will be performed at the school, all chemicals will be used in accordance with the MSDS.
2. The use of all chemicals will be done while wearing gloves, aprons, and goggles.
3. All chemicals that release fumes will be placed under the fume hood to prevent the release of fumes into the classroom.
4. A fire blanket, fume-hood, fire extinguisher, eyewash station, and shower are available for use.
5. Upon leaving the lab, hands will be washed and all chemicals will be stored in a locked ventilated chemical storeroom.
Chemicals and Heat:
1. Goggles and aprons will be worn.
2. During heating, potholders (thermal gloves) will be used to handle hot surfaces and equipment coming off the hot plate.
3. No containers will be sealed when heated. In the event a closed container needs to be heated a pneumatic trough or pressure release value will be used.
Electrical Power Safety
1. Limit the use of high power devices around water.
2. Never use frayed or cut wires when plugging in a device.
3. Never overload the outlet and use a surge protector.
4. All electrical devices should have an emergency cut off switch or ‘kill’ switch’.
5. Shut off and unplug all devices when not in use or when you leave the room unattended.
BSL 1 Aseptic Techniques:
1. Upon entering the lab, wash hands and arms up to the elbow with antibacterial soap.
2. Before and during experimentation wear rubber gloves, apron, and goggles at all times.
3. All glassware and material should be autoclaved for 30 minutes at 20 psi, 120 degrees Celsius.
4. Any open flask, container, or beaker should be covered with aluminum foil when placed in the autoclave.
5. Use 10 % bleach solution and wipe down the lab area and tabletop.
6. Transfer of any culture will be done with a mechanical pipette.
7. Place a biohazard sign in plain view for all to see.
8. Loops and Needles used to transfer the culture will be sterilized by flame heating until bright red prior to use. When not in use, needles will always be capped or covered. When not in use, place loops face up in a beaker. Never place loops on the counter.
9. The top of the culture-tube will be flame heated before inserting a needle or loop for culture transfer.
10. Upon leaving the lab, wash hands with 10% bleach.
Disposal: Petri dishes and other disposable equipment will be placed in a plastic bag and autoclaved for 30 minutes at 20 psi, 120 degrees Celsius and disposed of. All related glassware and related equipment would be autoclaved for 30 minutes at 20 psi, 120 degrees Celsius.
Autoclave:
1. Always wear goggles and aprons when using the autoclave.
2. The bottom of the auto clave should have about 2 inches of cleaned distilled water before operation.
3. Check the pressure release value prior to use (it should be clear)
4. Use potholders when opening or handling hot surfaces.
5. Opening the autoclave can be done only after the sterilizer after it has cooled (gauge should read zero.) and the all steam has been allowed to escape.
6. Place the control knob in the straight up position. This allows the unit to operate at 16-21 psi range.
Making Agar:
1. Agar is to be prepared by following the proportions of dehydrated media to distilled water and then autoclaved.
2. Store sterile agar in refrigerator.
3. Excess sterile agar will be wrapped in news paper and disposed of by placing in a landfill.
Preparation of Photobacterium Agar:
1. Measure out 23 grams of agar dehydrated media.
2. Measure out 1.0 L of distilled water in a graduated cylinder. Place in a 2 L Erlenmeyer flask.
3. Put flask with water onto hot plate and bring to a boil.
4. Once boiling, dissolve 23 grams of agar into the water. Boil for one minute to dissolve.
5. Pour liquid agar into reagent bottles.
6. Autoclave for 30 minutes at 20psi, 120 degrees C.
7. Store in refrigerator when cooled down after autoclaving.
Preparation of Photobacterium Broth:
1) Order and mix all the required ingredients:
-Sodium Chloride (30g)
-Sodium Glycerol Phosphate (23.5g)
-Pancreatic Digest of Casein (5g)
-KH2PO4 (3g)
-Yeast Extract (2.5g)
-Calcium Carbonate (1g)
-Ammonium Chlorine (0.3g)
-Magnesium Sulfate Hydrate (0.3g)
-Iron Chloride (0.01g)
Culturing:
1. On the underside of each petri plate label with each plate with a wax pencil.
2. Heat the photobacterium agar in a microwave or water bath to 50º C.
3. Pour a thin layer of agar on the bottom of each plate and cover immediately.
4. Let agar plate solidify. Liquid agar will solidify at about 42 º C.
5. After the medium agar has solidified, streak the plate with the proper technique.
6. Once the plates have been streaked, invert and close the petri dish, tape the edges if you wish and incubate them at 25º C for 24-48 hours unless other wise noted.
Streaking Plates
1. Sterilize work area and done safety equipment
2. Take out plates from refrigerator and allow to warm up to room temperature.
3. Take out bacterial culture to be streaked onto plates.
4. Take inoculating loop and scrape off growth from bacterial culture.
5. Place inoculating loop into sterile broth of distilled water and agitate.
6. Dip sterile swab into wash.
7. Lift up lid of plate and streak wet swab onto plate being sure to cover the entire area. Plate can be streaked multiple times in a sweeping motion to ensure plate overage.
8. When done streaking plates, put into incubator upside down. Depending upon the bacteria, growth can appear as soon as 24 hours later.
9. Dispose of materials.
Experimental Setup:
1. Purchase 2 vials of Vibrio fischeri from Carolina Biological Supply Company
2. Store all vials at room temperature with caps loosened until prepared for experimentation
3. Label each vial 1 and 2
4. Expose vials to designated amounts of sonar (wavelength currently not set)
5. After 48 hours, place Vibrio in a cuvette and measure the amount of light produced using a spectrophotometer.
6. After measuring light production, plate Vibrio and perform a serial dilution to determine population of each plate after sonar exposure.
Data Collection:
1. Activate the spectrophotometer; wait approximately fifteen minutes for machine to warm up.
2. Insert a half painted black test tube filled 10 mL of RO water solution into the spectrophotometer.
3. Close the chamber lid.
4. Record the light emission
5. Place the first test tube C1, into spectrophotometer, and adjust wavelengths to Vibrio’s emissions 490nm.
6. Rotate the vial so that the black painted area is facing toward the light emission to get a reading.
7. Close the chamber lid.
8. Record the reading of the light emission form the sample.
Repeat steps 2-8 for all remaining vials.
Cleaning up:
1. After each day of experimentation, clean the lab counter with 10% bleach.
2. Wash hands with 10% bleach.
3. Clean with 10% bleach all glassware and related items. Autoclave new equipment as needed.
4. Petri dishes and other disposable equipment will be placed in a plastic bag and autoclaved for 30 minutes at 20 psi, 120 degrees Celsius and disposed of.
5. All related glassware and related equipment would be autoclaved for 30 minutes at 20 psi, 120 degrees Celsius.
Disposal:
1. Items of biological hazard must be disposed of after autoclaving.
2. Put on protective equipment (goggles, gloves, aprons).
3. Gather biological items to be autoclaved prior to disposal.
4. Put items into autoclavable bag. Put bag in autoclave.
5. Autoclave for thirty minutes at 20psi, 120 degrees C.
6. When able, remove from autoclave and transport to dumpster.
Descriptive statistics:
1. Data will first be organized in a data table based on groups or variables.
2. The mean or average for each group or variable tested will be calculated.
3. Using an excel spread sheet the standard deviation for each group of variable will be calculated.
Correlations:
A relationship between 2 variables identified.
1. The independent variable will be identified and be known as ‘x
2. The dependent variable will be identified and known as ‘y
3. x2 will be calculated for each test.
4. y2 will be calculated for each test.
5. xy will also be calculated and used to find the correlation coefficient (r)
6. Using the formula for the correlation coefficient, (r) is calculated
7. If the r value is close to zero, there is no correlation.
8. If the r value is close to positive 1, there is a positive correlation. As one goes up the other goes up.
9. If the r value close to negative 1, there is a negative correlation. As one goes up the other goes down.
Inferential statistics:
Statistics applied to a sample population: If you are using any of these statistical test noted below, your procedures will be based on your individual data. In this case, you would need to design your own procedures and you will have to start with a null hypothesis and alternative hypothesis. Both the null and alternative hypothesis should be part of your research plan.
z-test- Used to compare proportions between two groups.
t-test- Used for a comparison of two means and z- test is used to show a comparison between the proportions between two populations.
t test measures the difference between the means of two groups, an ANOVA tests the difference between the means of two or more groups.
Chi-square test- Used to make a comparison of proportions within a group.
Vibrio fischeri
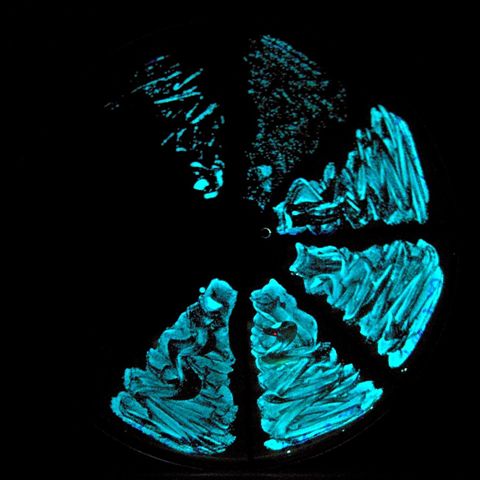
Emitting bioluminescence
Vibrio Fischeri Streak
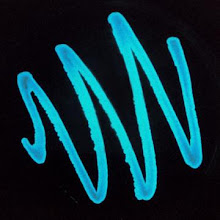
a streak of the bioluminescent bacteria
Bob Tailed Squid
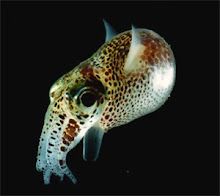
symbiotic host for Vibrio fischeri